Zoom

Tool Spotlight: Whiteboards in Virtual Meetings

Screenshot of a whiteboard

These days, Clark classes, meetings, and events often take place virtually in Teams or Zoom. While many of us know about the basic features of these online spaces, such as chat and screensharing, including a digital whiteboard in your next virtual gathering can be a unique, collaborative, and fun way to engage your fellow Clarkies. Whether you’re brainstorming ideas for a group project or outlining goals for a staff initiative, whiteboards can help the ideas flow!

How do I create a whiteboard?

In either Teams or Zoom, navigate to the screen-sharing option. When you opt to share your screen, the software presents you with a few different options: you can elect to share your whole screen, one app, or a whiteboard. Choose the whiteboard option, and everyone in the meeting will be able to see it and, if you choose, interact with it.

What can I do in a whiteboard?

The beauty of a whiteboard is that it is more open-ended than a traditional Word document that is typically used to take meeting notes. Once the whiteboard is open, everyone will have access to a toolbar. By selecting different options from this toolbar, meeting participants can type new text, draw diagrams, and add shapes such as hearts or arrows to draw attention to different parts or ideas. These functions vary a little between Teams and Zoom (in Teams, for example, you can add images or add flow chart templates to your whiteboard), but both are intuitive and easy to use.

What happens next?

Zoom users can choose to save the whiteboard to their device as a picture or PDF. Those who work in Teams will notice that the whiteboard will be added to the meeting chat after the meeting itself ends, and, depending on your account settings, may also be automatically saved in OneDrive.

I want to try this, but can I practice first?

Yes! Please reach out to techtraining@clarku.edu to learn more about this wonderful tool and how to use it.

Keep Zooming

While many of us are happy to say goodbye to days full of Zoom classes and meetings, the convenience, flexibility, and reach that Zoom offers means that it will be a part of Clark for a time to come. And while most of us are experts in its features now, we wanted to offer some new or under-used tips.

Update Regularly

The most important tip for a great Zoom experience is to update your software regularly. Zoom is constantly improving their software and to take advantages of these improvements you need to update regularly. Updating is quick and easy and as of this article, the current version is 5.8.0.

On your desktop (Windows or Mac): Open and log into your Zoom application, click on your profile icon (or initials) in the top right, click Check for Updates and follow the prompts.

On your phone, or tablet: You’ll get a prompt to update when there is a new version.

Live Transcription

An underused feature of Zoom is the ability for the host to display automatic (computer-generated) transcription, and allow participants to request live-transcription (both by name or anonymously).  This can help participants who have hearing-impairments, ESOL (English to Speakers of Other Languages) participants, participants who are experiencing poor audio on their device, and many more. While computer-generated transcriptions aren’t perfect and shouldn’t be relied on for community-members with ADA accommodations (students should contact Student Accessibility Services, while Staff and Faculty should contact HR) they can be a huge help for many listeners.

As a host: Ensuring that you’re using the most recent version of Zoom, start your meeting, click Live Transcript (may be in the More menu), click Enable Auto-Transcript.

As a participant: Ensuring that you’re on the most recent version of Zoom, look for the Request Live Transcription button (may be in the More menu), and choose to Request, or Request Anonymously. A host can agree, or decline to offer transcriptions.

Sharing your Pronouns

While many at Clark have edited their display names to include their pronouns, Zoom now supports automatic sharing of your pronouns when set in your profile. To add pronouns, visit https://clarku.zoom.us/profile, log in and chose the edit button to the right of your display name.

Note that pronouns are only displayed if you are on version 5.7.1 or higher.

Recordings

ITS often gets questions about Zoom recordings – how best to record a Zoom recording, how long they’re available for, and how to share recordings.

As a host in a Zoom meeting, you can choose to save recordings of your meeting to your desktop or to the cloud. Most hosts prefer to save to the cloud, so you don’t need to worry about the space available on your device or internet disruptions.

If you choose to save your meeting recording to the cloud, it will be automatically transferred to your Meeting Recordings folder in your My Folder in Panopto (https://clarku.hosted.panopto.com/). From there you can keep your recording private (default), share with a small group of specific people, share with the Clark community (log in required), or share it openly on the internet.

Back-up recordings are also saved to the Zoom web portal but are only available for 28 days after the meeting. You can view these back-up recordings at https://clarku.zoom.us/, and click on Recordings in the left-side menu.

Zoom in the News

In this time of social distancing, the world has gotten a rapid introduction to Zoom meetings. Zoom has also gotten a rapid introduction to the world. Their daily use has increased from 10 million meeting participants to over 200 million, and with that, everyone has experienced some growing pains.

You may have seen in the news recently there have been some technical, abuse, and privacy concerns with Zoom. Eric Yuan, Zoom CEO, has addressed some of these concerns in a message to users.

We’d like to share our thoughts on these as well as provide some tips around securing your Zoom meetings, the main take-aways being:

  • Update your application to reduce vulnerabilities
  • Choose your meeting settings to reduce the likelihood of Zoom-bombing
  • Make choices to protect your personal information

Vulnerabilities

Vulnerabilities in an application aren’t unique to Zoom, and our advice, as with any application, is to keep your software up-to-date.

Zoom-bombing

There have been reports of “Zoom-bombing” where uninvited participants join your meeting.

Protect your Meeting Links

You can’t Zoom-bomb if you can’t join the meeting, so the first step is protecting access to your meeting link. We suggest you post the link to your course meetings in your Moodle course where only your participants have access to them. You should not post links to your meetings to public websites or social media.

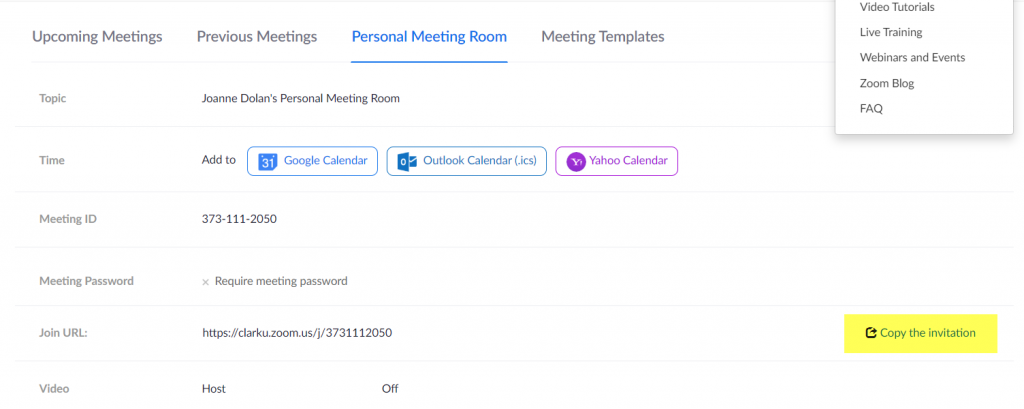
Also, rarely use your personal Zoom Room. Your PMI (Personal Meeting Room ID) never changes, so anyone you’ve ever shared that link with can join any meeting in your Zoom Room at anytime. By default, when you setup a new meeting it does not use your PMI.

Know your Meeting Settings

Zoom offers a range of settings for each meeting to help you make your sessions more secure.

All meetings created on or after 4/6/2020 have a password added to them by default. This will make someone guessing the link to your meeting much more difficult. Participants will use the link for your meeting just as they did before the password add (the password is  automatically embedded in the link). Still be mindful of how you distribute the link to your meeting.

You can add a password to an existing meeting. Once a password is added to a meeting, you should redistribute the modified link or distribute the password to your attendees. Click here for more information about adding a password to scheduled meetings.

You can use the Waiting Room feature. This feature doesn’t let anyone join the meeting unless you explicitly grant them access using the Participants panel. Click here for more information on the Waiting Room.

Finally, some other things you can do to minimize the risk of Zoom-bombing:

    • Set your meeting to mute all participants when they join
    • Set your meeting to not allow participants to unmute their own microphone
    • Lock the meeting once all attendees have arrived. This will prevent anyone else from joining the meeting (including late students)

The settings for your meetings can be managed at https://zoom.us/profile/setting and once in a meeting, you can control the participants microphones, lock the meeting, or forcibly remove people from the meeting, using the Participants panel.

Privacy

There have been privacy concerns around who Zoom shares data with, including Facebook and LinkedIn. Zoom has updated their app and changed their policies around data sharing, so be sure to apply Zoom app updates on your computer or mobile device.

If you have privacy concerns around using the full Zoom application, you can choose to use the Zoom web app, which only requires a web browser. Click here for information on how to join a Zoom meeting using the web app.

If your meeting only requires audio, you can also join from a traditional telephone by dialing in.

Final Words

As with most technologies, Zoom is not perfect. There are positive and negative aspects of using it, just as there are risks involved with having a conversation with anyone in the world. We believe the advantages of being able to share knowledge and maintain personal connections at this time, combined with some techniques to help manage the technology, outweigh the risks.

We will continue to monitor the technology landscape around all the tools we rely on, evaluate the risk of using them, and provide changes or guidance around them.

Online Meetings: Troubleshooting your Connection


With many people joining Zoom and Teams sessions over recent weeks, we’ve had questions about how to best ensure a clear, consistent connection.

Poor connections can impact your, and your participants’ experience in many ways – from stuttering video, to audio falling in and out, to freezing screens.

While every session, every connection and every device is different, there are some things that you can try if you’re regularly experiencing connection issues.

Before the Session

  • If you’re using a desktop or laptop, connect your device directly to your router with a network cable. This will help keep your connection stable, reliable and less patchy than WiFi.
  • If you are using a mobile device, or can’t connect directly to your router, try to move around your home to find a spot with a stronger connection. The general rule is the closer you are to your router, the stronger the connection. Additionally, some architectural features can cause some areas in your home to have a weaker connection
  • Consider what else is streaming on your internet. Close any applications that you don’t need during your session. If others in your house are using the internet ask them to refrain from streaming content during that time (Netflix, music, etc)
  • If you’re having audio issues in many sessions, be sure to run through a test prior to meetings to ensure you have the best setup possible.

During the Session

Zoom: Sharing Recordings from Panopto

If you’re running synchronous sessions with your students via Zoom, you should plan on recording them to make available to students who can’t attend in real-time. However, we also need to keep our FERPA obligations in mind when sharing those recordings.

When recording Zoom class sessions, you will have two options

  • Record to your computer
  • Record to the Cloud.

ITS’s recommendation is to record to the Cloud. This will save your recording to Panopto – Clark’s internal video streaming service. By default those recordings will be available only to you. However it will be easy to then move those recordings from your private Panopto folder, to your Course Panopto folder. This will allow access to these recordings to be restricted to the students enrolled in your course, and therefore protect the students privacy.

Click here for step-by-step instructions on how to move and share your recordings.

Zoom: First Steps

Once you have set up your Zoom account, and installed the client, here are some steps to get you started.

Find and Share Your Personal Meeting Details

There are a number of ways to find your personal meeting room information, but the details below will work on any device.

  1. Navigate to http://clarku.zoom.us/
  2. Click Sign In
  3. Enter your Clark account details
  4. You will then be on the your profile page.
  5. Click on the the Meetings option in the menu on the left side
  6. Click on the Personal Meeting Room tab at the top
  7. Click on the Copy Invite link, as seen below
  8. Share that information with your class via email or in Moodle.

Remember that students do not need a Zoom account to participate in your session. They should just click on the link in the invitation and follow the prompts

Schedule a Meeting

If you intend to use Zoom to meet with individuals or small groups for more personal/private discussions, we recommend Scheduling a Meeting. This will create a designated ‘room’ for that meeting and provide a different link to each student or group.

Click here to learn how to schedule a meeting.

Log into Your Meeting

The quickest way to enter your Zoom room, is to click on the link that you shared with your students – whether your Personal Zoom Meeting link, or a Scheduled Meeting link.

When you click on that link, it will open a browser window. Follow the prompts to open/install the Zoom client. If it asks for your email and password, log in.

Get to Know your Zoom Room

Knowing the features and details of your Zoom room is important to running a successful session. Practicing is key, so considering hosting a Zoom Party for friends and family members. By having a sympathetic audience you can experiment with the technology and become more comfortable.

For more help on learning about Zoom, check out the following resources.

More Resources

Click here to see more articles on Zoom, including how to find a link to distribute to your students, and how to hold an effective Zoom session.


Zoom: Running a Successful Class

Running classes in Zoom can be a great way to continue teaching and learning from a distance. There are some simple things that you can do to ensure that your sessions are successful. (If you haven’t read it already, check out our first article in this series – Planning a Successful Zoom Session)

Before the Session Starts

Starting your sessions with these simple steps can set you and your students up for a successful Zoom session

  • Just like regular classes, students may have questions. If possible arrive early and plan to stay a little later.
  • Greet participants by name as they join. Make them feel welcome and use the opportunity to ensure that their audio is set up correctly.

Provide an orientation to Zoom

Don’t assume that your students know how to use Zoom. During your first session, take some time to orient student to the meeting window, their audio options (including how to mute themselves) and the engagement tools.

Additionally, set expectations. Let students know if you expect them to connect via microphone, or if text chatting is ok, and if you’d prefer them to turn on their cameras. Be flexible with students who may have technology limitations or bandwidth issues.

Record your Session

We strongly recommend recording your Zoom sessions to share with students who may not be able to attend. Click here for more information on how to record your session.

Field Questions from Students

As in face-to-face classes, regular breaks in your presentation to prompt students for questions, clarifications or comments can increase engagement and understanding.

Additionally, setting an expectation on how students can ‘interrupt’ your presentation in order to ask questions can help them feel comfortable in doing so. Some faculty are happy for students to just use their audio to interrupt, others request that the students use the “raise hand” feature (click here for information on this option), others have the students ask questions in the chatbox, and have a TA or student representative ask the questions at specific times.

Stay Patient

Working with technology, especially new applications, can be stressful for faculty and students alike. Try to stay patient and calm if the technology doesn’t immediately cooperate. Communicate with your students via chat, or even email if you’re experiencing technical issues and ask them to be patient. Run through all the steps that you practiced such as restarting Zoom, trying another device and connecting to audio via cell phone. After the session, reach out to ITS (helpdesk@clarku.edu) for help and advice on what may have happened and how to be more successful in the future.

Click here to read more articles in our series on Zoom.

Zoom: Planning a Successful Session

As you’re considering using Zoom to reach and engage with your students or colleagues, consider these easy steps to plan for a smooth and successful session.

Get to know Zoom

Knowing how to use Zoom and practicing are two of the best things that you can do to ensure a successful session.

Click here to visit Zoom’s excellent support site that offers videos and step-by-step instructions on all aspects of their technology.

Additionally, take some time to practice. Connect to a Zoom session via a couple of different devices, for example on your laptop and your phone, or invite a TA or colleague to join so that you can see how the meeting looks to participants.

As you’re practicing, ensure that you know how to do the following things:

  • How to set up your audio and video
  • How to mute your audio, and how to mute your participant’s audio
  • How to share/hide your video, and how to do the same for the participants
  • How to see a list of participants
  • How to see the chat window
  • How to share your screen
  • How to call in from a phone if your audio has issues
  • How to start, stop and pause a recording

Consider your Technology and your Environment

Planning ahead and having backup options are the keys to successful Zoom sessions. Before your session…

  • Plug in your device so that you don’t have to worry about battery issues.
  • If possible, consider connecting directly to the internet with an ethernet cable.
  • Shut down any programs on your computer that you won’t need during your session, including anything that may display notification popups. This is especially important if you’re planning on sharing your screen.
  • Open all resources that you will need during your session.
  • Keep a cellphone near by in case you have difficulty connecting with your computer audio. Click here to learn how to call in to a Zoom meeting.

Additionally, consider your environment.

  • Choose a quiet location without noisy distractions.
  • If you’re planning on using your camera, choose a location with good lighting and raise your device to eye-level if possible. Consider what students may see in the background.

Click here to read more articles in our series on Zoom.